Adventures in sewing and quilting

It’s no secret that I love having a hobby; over the years, I’ve taken up knitting, embroidery, journaling, cross stitch, scrapbooking, photography, and birding, just to name a few. Now I’m adding sewing to the list—finally.
I say finally because I really should have done this years ago—my mom and grandma are both extremely competent sewists. It’s not an exaggeration to say that I grew up in fabric stores; we spent hours in them when I was a kid. My grandma excels at formalwear; she’s made several wedding dresses for family and friends over the years (and she once outfitted an entire bridal party of Barbie and Ken dolls in tiny tuxedos and gowns). Meanwhile, my mom’s area of expertise is kids’ clothes. When I was in kindergarten, she’d sometimes get up in the morning and make me a whole new outfit before I went to school in the afternoon, and she had her own business making children’s clothes for bougie families in Chicago and Evanston that grew out of other parents in public asking her where she got my clothes. Her Halloween costumes are also epic—she’s literally won the national contests put on by big pattern brands several times in the past 30 years.
But for whatever reason, sewing never really clicked for me. I’ve actually had my mom teach me twice—once when I was 18, and again in 2021—but for whatever reason, it just never really stuck. The learning curve with sewing is quite high, and the first two steps—making a bobbin and threading your machine—are arguably the two hardest ones. Doing either thing wrong will typically result in a big mess, which means there’s a huge barrier to overcome right at the outset. So both times my mom taught me, I completed one project successfully with her help and then kind of abandoned the whole endeavor.
But I found myself thinking about sewing again after moving into a new apartment and wanting to be able to make simple home goods, like pillows and curtains. I decided 2025 was going to be the year. At the beginning of January, I signed up for a four-week course at the New York Sewing Center; my hope was that going to an in-person class regularly would help me build enough momentum to actually stick with it this time. I’m happy to say that this approach worked, and I’ve been on a roll for the past month.
While I was taking the train home from my first class, I had the sudden realization that I would love to learn to make quilts, and I wondered if perhaps making squares would be a good way to practice sewing straight lines. After poking around a bit on Reddit, I discovered that quilting is definitely a feasible option for beginners. By the time I’d gotten off the subway, I’d decided that would be the route I’d take outside of class. I started working on my first quilt a week later, and seven days after that, it was done. Is it perfect? Of course not. But it showed me that I could do this, and it got me fully hooked.


Quilting also unlocked something for me: I think part of the reason I had trouble sticking with sewing in the past is because I’m not terribly interested in making clothes for myself. I’m not saying I’ll never do it, but it’s just not something that really inspires me—because I don’t personally care about clothes that much. While making the pair of pants that we worked on in my class, I began to understand why my mom prefers sewing for kids vs. adult—she always said she likes “short seams.” And honestly…yes! And it turns out that smaller pieces that don’t have to fit on a human body are great for beginners: Taking a project from start to finish takes a lot less time (and requires less fabric!), which means the stakes are lower overall. And because the seams are shorter, you a) realize quickly when you’ve make a mistake, and b) can undo said mistake faster. Put another way: It’s a lot easier to rip out a short seam than a long one.
My sewing machine
On the first day of my sewing class, the instructor said it takes about three weeks to stop being afraid of the machine, which was both super validating in terms of why I’d struggled in the past, and also extremely accurate to my experience this time around. Sewing machines are intimidating; there’s no other home appliance that makes me feel like I’m using machinery in quite the same way. The sooner you start, though, and the more regularly you use it, the faster those three weeks will go by.
I’m currently using the Brother CS7000i sewing machine at home. I bought it for $185 in 2021 but it’s now retailing for $349, which I think is maybe because it’s an older model that’s being phased out. The newer version is the Brother CS7000X, which is currently $239 on Amazon. In class, we used basic Janome machines (similar to this one in terms of the features) that worked perfectly well. While I don’t think my machine’s computerized features are really adding much, this particular Brother model has a couple features that I love: One of the most difficult steps—putting the bobbin in correctly, and then picking up the bobbin thread with the top needle—is essentially done for you, without any guesswork. It eliminates a ton of the problems that beleaguer beginners, and to me, that is deeply, deeply worth it.
One downside of my machine is that the “throat” (the open space between the top and bottom of the machine, between the needle on the left and the body of the machine on the right) isn’t very big. This is likely going to be a problem when I start making bigger quilts, because you need to be able to pass a lot of thick fabric through that area as you sew. Assuming I stick with this hobby, I will probably eventually upgrade my machine to one that is really well-suited for quilting, but I want to make sure I’m totally committed first.

A lot of people online will tell you to try to get an older/used Singer model—essentially, what my mom and grandma still sew on—because machines were better made 20 years ago, and are true workhorses. While I don’t disagree, and I think it’s reasonable to use one of those if you inherit it or come across one that’s super cheap on Facebook Marketplace, I do think buying a used machine has a couple of downsides.
First, if the used one breaks early on or needs servicing, you’re probably going to end up paying a good amount to have it fixed. (Also, there are apparently only two authorized Singer repair shops in the entire state of Michigan?) And if you don’t live somewhere with a good sewing shop where you can easily get help (or don’t have a family member who can help you who lives nearby), you’re going to be very reliant on YouTube for troubleshooting…and videos showing you exactly how to use these older machines just might not be as present there. The flip side of this is that all sewing machines are very similar—I recently watched a video of a rusted Singer from 1894 being restored and was genuinely shocked by how similar it was to modern ones—so you might be able to figure out the issue even if you can’t, say, find your model’s manual online.
All this to say: Buying a used machine is ideal from a sustainability POV, but I do think it’s worth being aware of the potential downsides and costs if you’re going this route to save money.

Helpful resources
When it comes to getting started with quilting, Reddit swears by Melanie Ham’s “Your First Quilt” series on YouTube, so that is what I used and I would wholeheartedly recommend it. She’s a great teacher and I think the project is perfectly sized—it’s big enough that you’ll learn all the important steps (and do them at scale) and will feel extremely accomplished when you’re done, but it’s still small enough to be manageable. I watched all six videos in the series from start to finish before I started working, which I think was helpful—it meant nothing was a surprise once I got going, and I better understood why we were doing things a certain way at each step.
Reddit also recommend the Just Get It Done Quilts channel on YouTube, which I have found to be great. I turn to these videos more for support/supplemental material vs. “here’s how to make a quilt from start to finish.” These are the three I’d recommend/that I wish I’d watched before I started making my first quilt:
I also picked up a bunch of quilting books from the library, and I bought a few. The one I think is really worth owning is Quilter's Complete Guide: The definitive how-to manual by two of America's most trusted quilters. You know I love an encyclopedic resource written by a woman who knows her shit (see also: Home Comforts), and this book is very much that. It was originally published in 1993 and re-released in 2019, and it’s just a very solid foundational reference that I’ve gone back to repeatedly for both inspiration and guidance.
Patterns
In general, I find reading patterns to be one of the hardest parts of sewing! (I feel this way about knitting too.) That’s actually one of the reasons I’m enjoying quilts—generally, I think the patterns are just a lot easier to work through. In any case, here are the ones I’ve used thus far…
Simplicity 8299. This is the pattern I used in my sewing class to make a simple pair of pants. It has pockets, which makes it harder, but it was definitely helpful to work on pockets for the first time when I had an instructor who could check my work each step of the way. I made these out of corn fabric that I bought with the idea of making masks from it several years ago and then never used (waste not, want not!); it’s honestly so stupid (in a good way!) and made the project feel a lot less serious and more fun. The pants also ended up being surprisingly comfortable, which was a nice surprise! (And they have pockets!!)
Scrappy sawtooth star coaster. This is how I learned that while short seams are good for beginners, tiny seams might not be. It was ultimately fine; I finished the coaster quickly and it turned out reasonably well. But I realized that something this small can actually be more fiddly than you might think, and that medium-sized projects might be a better move for me right now.
Soup cozy. This was a fun little project that took around an hour and 15 minutes to make, if that. It’s super practical if you eat a lot of leftover soup or otherwise reheat things in bowls in your microwave regularly. (I also got more use out of the corn fabric!)
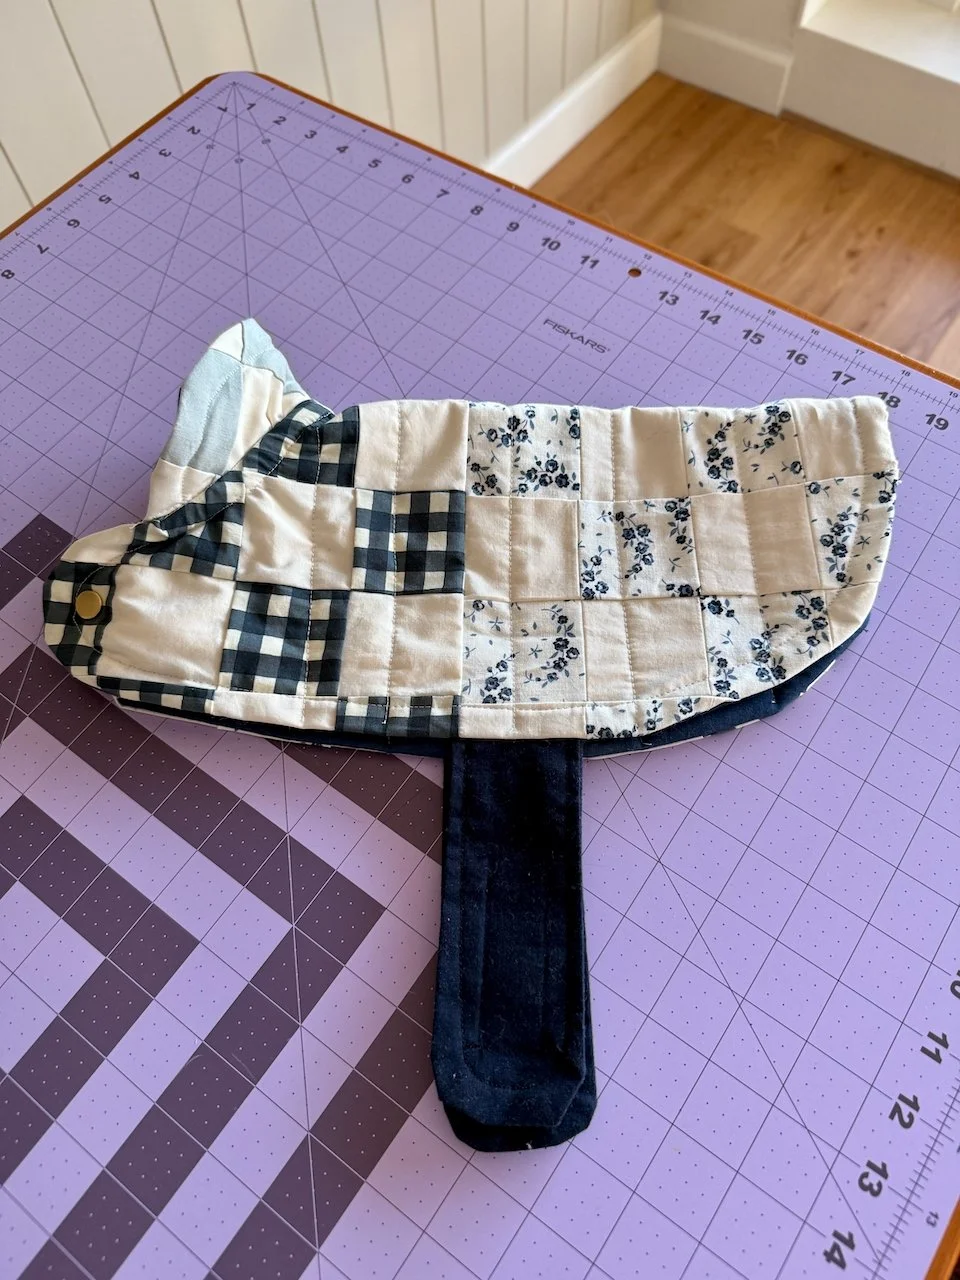
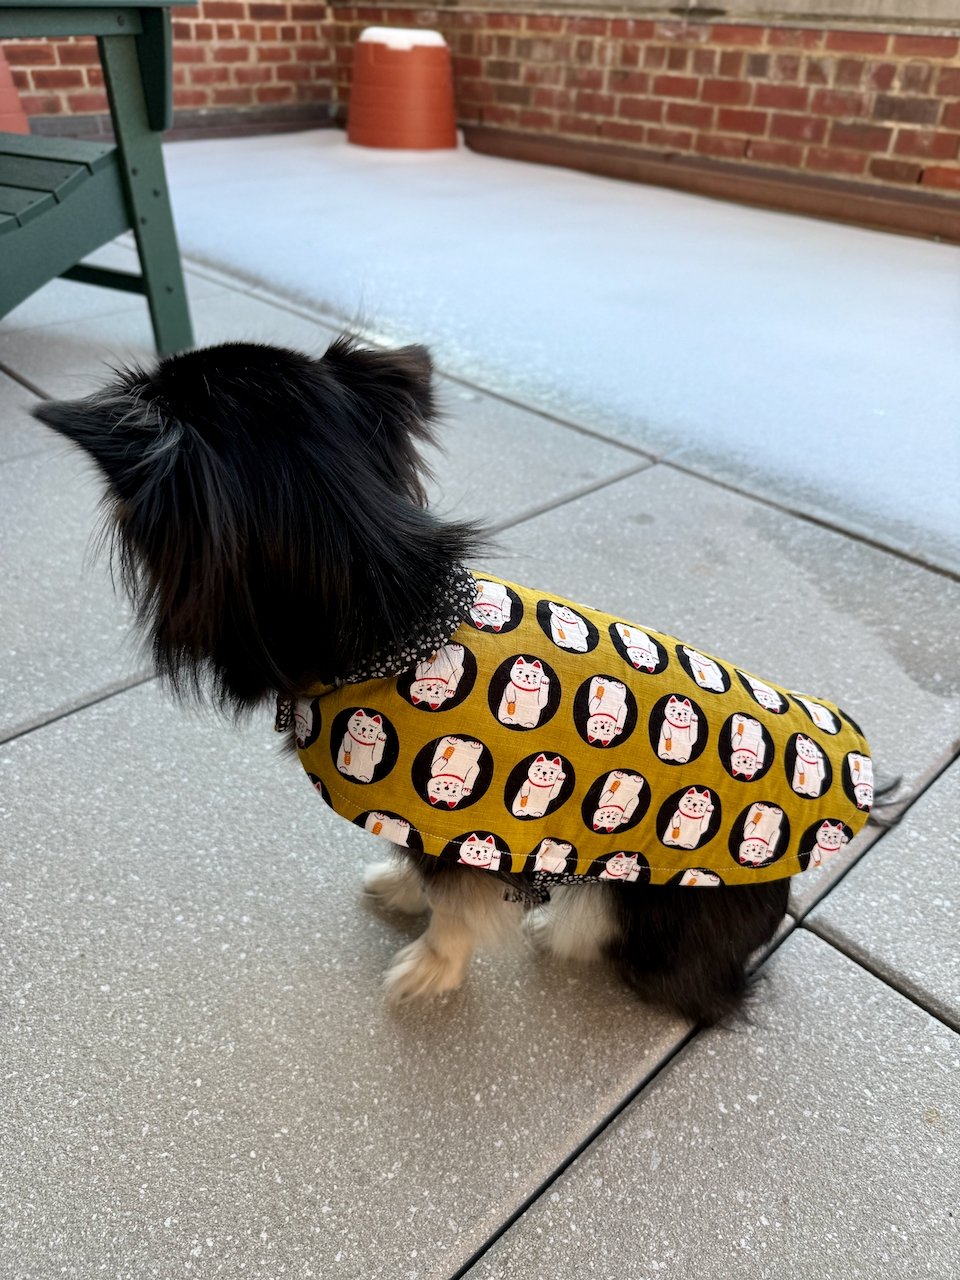
Simplicity 9426. This dog jacket, to me, is the Platonic ideal of a practice sewing project. It’s easy enough (though, again, I found the pattern very confusing in a few spots); it comes together quickly; and the finished item is genuinely practical. It also lends itself well to cute fabric combinations. I’ve made it twice already!

The first time, I used a Joz Makes Quilts tutorial to make four blocks made up of 16 small squares each, which I then sewed together and used as the top piece of the jacket. (I used an extra quilted square to make the collar.) I did this mostly because I wanted to practice cutting and piecing a quilt, and because it made the coat project feel more interesting and fun.
The second time I made the jacket, I basically did a speed run and completed it in just a couple hours on a Saturday afternoon. I decided not to quilt it this time because a) I thought the stiched lines would take away from the cute print, b) I didn’t trust myself to sew the seams straight and I knew they’d be really visible since I didn’t have a matching thread color, and c) I didn’t think there was enough batting for this to be totally necessary, especially since it was already top-stitched. (Also, I can always go back and quilt it later if I change my mind.)
Overall, I really like this pattern, and I’m pretty sure I’ll be making it several more times in the coming months.
At the moment, I’m currently waiting on the fabric I need to get to work on a Shoofly quilt from Penelope Handmade (weirdly, it looks like the specific pattern is no longer online).
Final thoughts
As I worked on my first couple of sewing projects, my thoughts regularly returned to my friend Alanna’s book, Knit a Hat. In the intro, she makes the case for starting with a hat over a scarf, even though a scarf is a common beginner project because it’s so simple. You only need to learn a couple of techniques to make a scarf, but, she argues, that repetition can get really boring—which makes it very easy to give up on after you inevitably make a mistake or two. A hat, though, requires you to learn several new skills at once, which keeps you engaged and also sets you up for something a lot more fun for your second project. So as I’ve been going about this, I’ve been trying to avoid metaphorical scarves in favor of hats—because if something isn’t fun to make, you’re just…not going to have fun making it!
There’s also a section in Alanna’s book titled “It Will Be Wonky”—and this is the other thing that has been top of mind for me as I practice. If you’re not good at the beginning, she writes, it doesn’t mean you’re not crafty or you’ll never get it: “In fact, it can be good to surrender to the process, to not feel like you have to be totally in control at any given moment. And if your first couple of rows, or even your first couple of projects, turn out a little wonky, it’s not the end of the world.”
I’ve really tried to embrace this approach as I’ve worked on my first projects, and I think it’s making a difference. Success, to me, right now, is simply finishing. I’m fighting the urge to give up just because something isn’t going perfectly, and—surprise!—I haven’t died as a result. Sure, some of my seams are crooked or wobbly or don’t line up perfectly…it’s fine. It’s a coat for a dog. (Also, for what it’s worth, a lot of little mistakes are way less noticeable than you might think when all is said and done and you’re observing your project from three feet away instead of six inches.) No one likes being bad at things, of course, but also…I keep reminding myself to get a grip. It’s a pair of corn pants! It’s a coat for a dog!

Honestly, I'm just so thrilled to be making things again! I really missed it. 🪡